Wednesday, April 30, 2008

Re-Coloring a Digital Element

My DD is having piano lessons tonight so while waiting for the lessons to be over, I have time to do another tutorial.

This one is about re-coloring a digital element - like the background paper, the frame, a ribbon, etc. What I have here is a purple flower (by JJJosianne - LittleFlower). If any of you have any ideas about re-coloring digital elements other than what I do, please drop me a line. But for me, this is how I do it. As usual, I used CS3 to create the following pcitures. The recolor tool is in a different location in other versions but the steps I use are the same.

Open the element you want re-colored. If it is already on your layout, choose that layer. Choose a color you want by clicking on the SET FOREGROUND COLOR BOX at the bottom of the TOOL BOX. Choose your color from the COLOR PICKER. I chose yellow.

Locate the COLOR REPLACEMENT tool in the TOOL BOX. In older versions of CS it is the RED EYE TOOL. If you don't see the red eye tool, locate the band-aid icon; click on that one and you'll see the red eye tool - click to choose. Re-color the entire element, make the brush size bigger to do the job quicker.
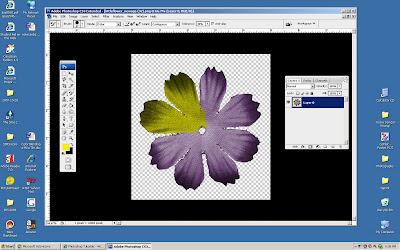


You may find that the color you expected is not the one you want. Like the one I have above. I chose a bright color but when applied on the flower it looks yucky! That's because of the purple background. So what I'd do next is to adjust the color. There are 2 different ways I do this and choose the one that gives me the best results.

The first one is by adjusting the brightness/contrast of the image - see below.
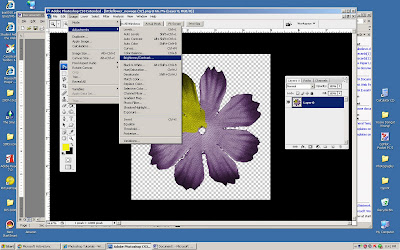


Move the sliders [I really don't know what they are called] in the CONTRAST/BRIGHTNESS box towards the right to make the image's color brighter. Keep moving sliders until you achieve the desired result.
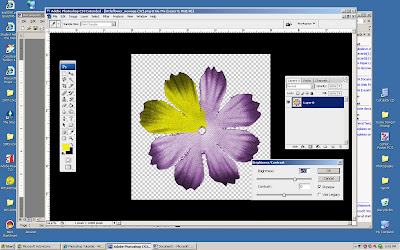


Or if not satisfied, the other step I use is as follows: Instead of choosing BRIGHTNESS/CONTRAST, I chose COLOR BALANCE.

In the COLOR BALANCE BOX, I moved the yellow slider all the way to the left.
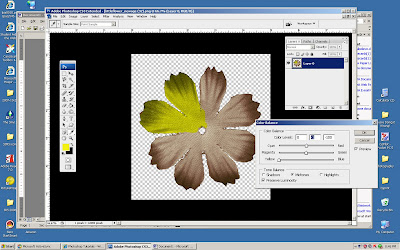


You'll notice that the yellow is now a little brighter. I clicked OK and repeated this one more time. By repeating, the yellow became "yellower". Experiment by moving all the other sliders one at a time or in combination with each other until you achieve the result you want.

Remember, although you changed the color of the element, re-sized it, rotated it, you still cannot claim it as your own if you are not the original creator. You still have to give credit to the artist/designer who created it.

Happy recoloring!
Monday, April 21, 2008

Aspiring Dreamer

I'm loving the digital supplies at Little Dreamer Designs. I bought four kits for $2.00 each. These were made by new Dreamers and they are so lovely. Here are a few more layouts I made using Little Dreamer Designs kits.


Tuesday, April 15, 2008

My Hidden Journals

My sister, Lee, came up with this month's idea for the Pinoyscrapbookers' Kaya! Challenge. See here for details of the challenge.

I am mostly a digital scrapbooker for the reason of convenience. Anyway, digital layouts are excluded from this challenge. I think because my sister thinks that digital layouts won't meet 2 of the requirements:

1) the hidden journaling component

I don't see any problem with the hidden journaling component. It is hidden anyway. True, the time comes when the recipient has to take out the sealed message. And you probably have blurted out loud... "How in the world are they going to do that with a digital layout?!"

I don't know how other digital scrapbookers save their layouts, but this is how I preserve mine.

I have hidden journals and messages behind my pictures.


Credits: Coralie's Fanciful Kit: journaling tag, blue ribbon, swirls, butterflies; Avril's Karine Kit: paper, flowers, mat; fonts used: Fonts: Depressionist Three & Freestyle script

See where there are those tags and pieces of paper peeking out at the side? Those are not just there as part of the decoration.


Credits: All supplies used are from ScrapFamily;fonts used - Fajita ICG & Chubby Trail

Those are where my journals are written. Journals that may not aesthetically go well with my layout have they been written out there in the open.


Credits: KSharonk's Faded freebie mini kit [recolored blue flowers into yellow; Miss ViVi's swirls from Kit A Vende; Fonts: Free style Script & Palace Script MT

Most of my layouts have hidden stories of what happened during that day. Not just who are in the picture, where it was taken, what the occasion was, who didn't show up, who messed up, who was funny, who cried, but also my inner most thoughts and feelings.

Lately, I have been making these hidden journals a little conspicuous... and not so conspicuous... see that greenish piece of mat behind the picture? There's journaling right behind there!


Angela Sharrow - A Spring Garden QP; flowers & swirls added from Avril's kit
Yellow bow is from one of Angela Sharrow's QP; Font: Edwardian Script


So now, the answer to the million dollar question... how will one be able to read those journals?

I save my digital layouts in two different versions. One in jpeg version so I can upload them easily in galleries; and the other in psd version where some of the layers are preserved as separate from the rest. I don't merge or flatten all my images. Then I burn my digital layouts onto DVDs.

So in the future, when any of my loved ones want to know what's with the picture, they insert the DVD into the computer, open the file, and with the use of the mouse, drag out the hidden journal to read it. Since by this time the files are read-only, there is no fear of messing up the arrangement of my layouts. When they are done reading, whether they return the note back in its original position or not, it will go back to how it was saved. Ready to be pulled out and read again.

I showed my daughter how this works so she will be aware of what to do.

2) recipient to be able to touch and feel the components of the scrapbook page.

Well, this one is a winner. No matter how much they'd touch the monitor, they won't feel anything but the warm smoothness of the screen. But still, my journals will keep them informed; they will feel the thoughts I will leave behind; they will be touched with the love I have for them.

If you think this digital scrapbooking idea is awesome, something you will consider to use on your future layouts, please drop me a line. I'd like to know what you think. TFL.